An alternative title for this page could be “why are my images grainy or blurry”, but that would be a bit too long. If you are suffering from either of these issues and don’t have the foggiest why, then start here.
What is ISO anyway?
Put simply, ISO is a measure of the sensitivity of your camera’s sensor. In the old analogue days it literally measured the photo-sensitivity of the film.
Getting this magic number right (or pretty close) is the first step in getting a significant improvement in your results with your DSLR. Most of the experimentation that you may try can be done with the camera in auto mode but you must take control of the ISO. Of course you can leave your camera in full auto mode (where the camera also chooses the ISO), but when the issues mentioned above do crop up you may never know why. The ISO setting is one of the 3 crucial settings which together all affect the exposure of your image – the other two being shutter speed and aperture. For this reason they are often referred to as the ‘Exposure Triangle’.
Rather than trying to hit a target within this triangle by experimenting with all three at once, my suggestion is that you first select an appropriate ISO and then let the camera choose the other two using its built-in light meter. After a little while you will gain confidence in overriding one or both of the aperture and shutter speed settings as well to gain even more control. By the way, this is how it was done in the olden days.
Once you fix the ISO, then the exposure triangle becomes an exposure line. By using this model it is much easier to demonstrate the way that aperture and shutter speed interact. Have a look at the illustration below. For any given ISO, the camera can correctly expose the image using any combination of aperture and shutter speed along this line. The amount of light reaching the sensor is represented by the area of the rectangle under the line, which you can see remains constant. Yes, it’s a bit scientific, but once understood, it will become second nature to you.
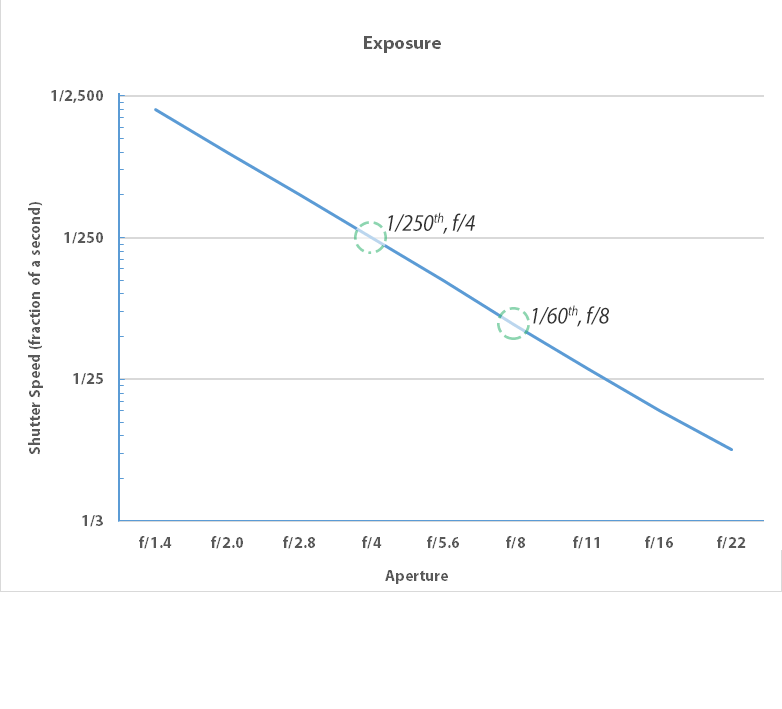
Again, by referring to this illustration, the two highlighted combinations represent common settings that you may choose if you are shooting sport or general outdoor respectively.
The ISO range
OK, so first the basics. The ISO setting usually sits in the range 100-1600. Some cameras push this further to 3200 and even higher. The bigger the number the more sensitive the camera. The problem with choosing a large number all the time, is that it adds ‘grain’ to the image which is probably not what you want.
So start with this guide and we’ll work from there.
ISO range selector
| ISO | Useful for | Implications |
|---|---|---|
| 100-200 | Landscapes, bright outdoor, beach scenes | Minimises grain artefacts. |
| 400-800 | reduced light environments (indoors), events where things are moving more quickly (or perhaps you are) | Useful for higher shutter speeds. Also naturally reduces depth of field when combined with 'wide open' aperture. |
| 800-1600 | This is a not used often, but required for catching action in the dark. Astronomy, parties (with a flash) etc. | There will be some amount of grain depending on the quality of the sensor. |
Depth of field?
This term describes how much of the background is in focus along with the subject. Before we go into details, let’s explore what the aperture looks like and how it is measured. Firstly the measurement is just a number which typically ranges from f/3.5 up to f/22 depending on the camera body and lens. The bigger the number, the smaller the hole. Simple. However remember that it is not a linear scale, so it is not true to say that f/4.0 yelds twice as much light than f/8.0. Look at the illustrations below.


For portraiture many people prefer a small depth of field which results in the ‘blurry background’ effect. In this scenario, what is happening behind the scenes is as follows:
Assuming that your ISO is fixed, your camera’s built-in light meter is saying that the aperture inside the lens must be open to nearly its maximum in order to get the correct amount of light reaching the sensor at the recommended shutter speed. If you are relatively close to your subject or using a zoom greater than 50mm then this can be achieved at around f/4.0. If you are much further from your subject then you’ll need to zoom in more (probably a good idea anyway), or choose a larger aperture (smaller number). Large aperture lenses (up to f/2.8 for example) can be double the price of their f/4.0 equivalent which is definitely in the professional domain.
If landscape is your thing, then you’ll want the exact opposite. That is, as much of the foreground and background in focus together at the same time. Therefore select a smaller aperture by selecting f/16 or a larger number.
Getting depth of field right can be tricky. If you are aiming for a blurry background and your camera won’t allow you to select a big enough aperture (because it will overexpose the image), then try selecting a slightly lower ISO (for example, change from 400 down to 200). This may help the aperture issue, but may result in the camera pairing it with a slower than acceptable shutter speed (for example, 1/30th of a second). In this case, your only options are to use the flash, or invest in a lens with a bigger aperture. Now you know why the professionals carry around a number of different lenses.
If you are going for the blurry effect (a shallow depth of field) then it is crucial to focus on the most important part of the subject. For people that is usually the eyes. If in doubt (say it is a group photo with several rows of people), then focus on the front row as the blurry effect is always more pronounced in front of the actual focal point than behind it.
The effect of changing the ISO
Changing the ISO does not of itself change the exposure if you let the camera do the work and calculate a pair of aperture and speed settings that yield the correct amount of light hitting the sensor. By referring again to the Exposure table above, increasing the ISO effectively shifts the entire line to the right. This means that for any given shutter speed, a smaller aperture is required. Not surprisingly the opposite is true. By decreasing the ISO, the line shifts to the left.
Understanding this will help you better set up for a desired depth of field and which is why I recommend reducing the ISO slightly to try and improve the blurry effect.
If you have any comments on this article or suggestions for future articles, then please use the Contact page to send a request to the author.
Tim Downing, 30 April 2015.